Skip to content
Biggest Sale of the Year | Up to 50% Off! No Code Needed
Contents
  • 1. What ultrasonic cleaner do you need For Fuel Injectors?
  • How to Clean in an Ultrasonic Cleaner
  • Tips for Cleaning Fuel Injectors in an Ultrasonic Cleaner
  • Best Ultrasonic Cleaner Works For Cleaning Fuel Injectors and Car Parts
Contents
  • 1. What ultrasonic cleaner do you need For Fuel Injectors?
  • How to Clean in an Ultrasonic Cleaner
  • Tips for Cleaning Fuel Injectors in an Ultrasonic Cleaner
  • Best Ultrasonic Cleaner Works For Cleaning Fuel Injectors and Car Parts

Can You Clean Fuel Injectors in an Ultrasonic Cleaner?

Cleaning fuel injectors in an ultrasonic cleaner is not only possible, but it is also the most effective and least demanding way to get the rust off and get the shine back to your injectors. 

  • First, the ultrasonic cleaning solutions used in an ultrasonic cleaner are specifically made to handle rust, and so, they are more effective than most of the other solutions out there.
  • Also, an ultrasonic cleaner reaches parts of the fuel injectors that you will not be able to reach with any other fuel injector cleaning method.

The best thing about cleaning rusted fuel injectors in an ultrasonic cleaner is that it is effortless and stress-free. The machine does all the work, and if you are not satisfied with the results, you can repeat the process until you get the desired shine on your fuel injectors.

The method of cleaning fuel injectors we are introducing in this blog will enable you to clean your fuel injectors in an ultrasonic cleaner in less than thirty minutes.

how to clean fuel injectors with ultrasonic cleaner

1. What ultrasonic cleaner do you need For Fuel Injectors?

  • It must have a basket so the items can float without touching the bottom of the ultrasonic cleaner.
  • It should have a heater for better liquid penetration
  • It should have a cover to dampen the sound 
  • It should have digital controls: a heater and a timer

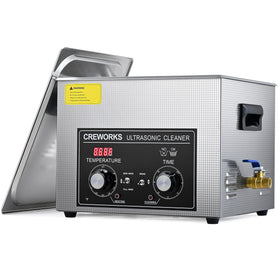
Specifically, I used Creworks 2L Knob Digital Ultrasonic cleaner with a 60W ultrasonic cleaner and 100W heating power. If you have something like this, cleaning should be easy. 

How to Clean in an Ultrasonic Cleaner

There are three important steps to clean in an ultrasonic cleaner: set the ultrasonic cleaner to heat up, put the items in, set the timer, and clean (repeatedly if necessary) until you obtain satisfactory results.

Step #1: Heat Up the Ultrasonic Cleaner

Fill it up with ultrasonic cleaning solution: For fuel injectors, an all-purpose ultrasonic cleaner solution works great. You can go for Creworks all-purpose cleaner. But I have had reports of Dawn dish soap also being a good option. I have never tried, but I think it could work.

Step #2: Set the heater to the right temperature.

I set mine to 50 °C, and set the timer to 10 mins. After 10 minutes, the ultrasonic cleaner is sufficiently hot. You will know it is hot enough when the timer goes off. 

Now, put in your basket, and drop your old fuel injectors into the ultrasonic cleaner.

Step #3: Let the Ultrasonic Clean for 10 Mins

Again, set the timer to 10 mins. When you hear a hissing sound coming from the ultrasonic cleaner, it means the cleaning has started.

Close the lid to minimize the noise levels, and wait until the timer goes off.

Step#4: Take out Items and Inspect

When cleaning is done, take out your items (using a tong) and inspect. Leave the basket in the ultrasonic cleaner, in case you need to continue cleaning. 

When your injectors are fully cleaned, rinse and dry them. You can even use compressed air and ensure no moisture remains before reinstalling them.

Your fuel injectors should be clean: the rust at the top, edges, and along the surface cleaned.

If you are not satisfied with the result, set the timer for another 10 minutes and put the items back for another round of cleaning. 

With the 60W cleaning power of an ultrasonic cleaner, it took me just one try to get the desired results.

Tips for Cleaning Fuel Injectors in an Ultrasonic Cleaner

  • Always use the right cleaning solution: Though a multipurpose ultrasonic cleaner with do a good job, choose one made for fuel injectors or carburetors, not plain water or harsh solvents.
  • Remove O-rings and plastic parts before cleaning: These can melt or deform in the ultrasonic cleaner.
  • Set proper temperature and time: Keep the temperature around 50-60°C, and clean for no more than 20 minutes per session. Ideally, keep the sessions at 10 minutes like I did.
  • Use agitate or pulse injectors: To help the cleaning fluid reach internal passages.
  • Rinse and dry the injectors thoroughly when done.  Use compressed air and ensure no moisture remains before reinstalling.
how to clean fuel injectors in ultrasonic cleaner

Best Ultrasonic Cleaner Works For Cleaning Fuel Injectors and Car Parts

The best ultrasonic cleaners for fuel injectors and car parts all share some key features: they come with baskets, have digital controls for heat time, intense cleaning power (60W+), and are sizeable enough to contain different car parts.

Browse through the following Digital Ultrasonic Cleaners from Creworks and find one that fits your needs.
Michael Anderson
My name is Michael Anderson, and I am a senior engineer specializing in heavy machinery and equipment. I hold a degree in mechanical engineering and have extensive experience in mining and construction industries worldwide. My aim is to simplify complex technical concepts, making them accessible and understandable to a wide audience.
Next article How to Install an Industrial Water Chiller

Leave a comment

Comments must be approved before appearing

* Required fields