With over 10000+ orders
With over 10000+ orders
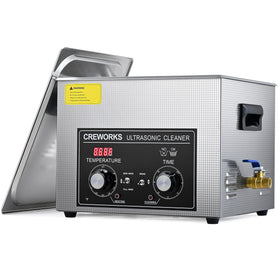
Most ultrasonic cleaner manuals don't tell you the whole story. After testing dozens of models and helping thousands of users, we've discovered that even basic ultrasonic cleaners can deliver professional results - if you know how they really work.

You might notice your ultrasonic cleaner's display shows one temperature, but the solution feels hotter. This happens with most ultrasonic cleaners, even expensive ones. The ultrasonic vibrations that clean your items also generate heat, typically 12-15°F higher than what your display reads.
Instead of returning your cleaner or buying a more expensive model, use this simple solution: get a basic cooking thermometer. If you want to clean at 135°F, set your machine to 120°F. When you turn on the ultrasonic function, watch the temperature naturally rise to your target. This small step protects both your cleaner and your items.
Your ultrasonic cleaner uses sound waves you can't hear to create millions of tiny bubbles in water. These bubbles do all the cleaning work. When they pop, they create tiny shock waves that blast away dirt and grime from every surface they can reach. It's like having thousands of microscopic scrubbing brushes working at once.

This process also creates extra heat, which is why your ultrasonic cleaner might feel warmer than the temperature you set. Understanding this helps explain why your cleaner behaves the way it does.
Professional shops don't just drop items in their cleaners and hope for the best. They follow a simple process that works every time. Let me share what they do differently:
First, they never rush the cleaning process. Each cleaning cycle needs about 30 minutes to work properly. Running multiple short cycles won't give you better results – it might actually harm your machine.
Second, pros always let their ultrasonic cleaner rest for 15 minutes between cycles. This cooling time is essential for keeping your cleaner working well for years.
To keep it short:
The best way to know if you need another cycle is to check your items after the first 30-minute run. If they're not quite clean enough, let your cleaner cool down for 15 minutes first. This cooling period isn't just about temperature – it helps protect the ultrasonic components that do the actual cleaning work.

Many people think they need to spend hundreds more for better cleaning results. But most of the time, you just need to adjust how you use your current cleaner. Here's what makes the biggest difference:
Start with room temperature water when possible. This gives you better control over the final cleaning temperature. Add your cleaning solution according to the instructions – more isn't always better.
Let the cleaner heat up before starting the ultrasonic function. This simple step helps maintain more stable temperatures during cleaning.
Most importantly, give your cleaner enough time to work. Ultrasonic cleaning isn't instant. The microscopic bubbles need time to break down dirt and grime properly.
Your ultrasonic cleaner works best when you match the cleaning cycle to what you're cleaning. Think of it like washing clothes - you wouldn't use the same cycle for delicate silk and heavy denim. The same idea applies here.
For light cleaning jobs like jewelry or eyeglasses, a single 3-5 minute cycle often does the trick. But don't be surprised if tougher jobs like carburetors or heavily soiled items need the full 30-minute cycle. The ultrasonic waves need more time to break down stubborn dirt and grease.
Some items might need multiple cycles to come completely clean. That's normal, especially for parts that haven't been cleaned in a while. Just remember to give your cleaner that 15-minute rest between cycles. It might feel like wasted time, but it actually saves you money by preventing damage to your cleaner.
The cleaning solution you use matters just as much as how you run your ultrasonic cleaner. Plain water won't give you the best results, even though the ultrasonic action still works. The right cleaning solution helps those ultrasonic waves work more effectively.

Different materials need different solutions. What works great for jewelry might damage brass or aluminum parts. Always check what's safe for your items before starting. And here's a pro tip: mixing solutions stronger than recommended won't clean better - it might actually cause problems.
Nevertheless, your ultrasonic cleaner can last for years with basic care.
These simple steps help your cleaner maintain its cleaning power over time.
"My items aren't getting completely clean."
This usually means one of three things: your cleaning solution needs changing, you're trying to clean too many items at once, or you need another cycle. Try cleaning fewer items at a time first - overcrowding the basket reduces cleaning power.
"The cleaner makes a loud noise."
Some noise is normal - that's the sound of ultrasonic waves working. But if your cleaner suddenly gets louder, check if the water level is too low. Always keep items fully submerged, and maintain the right water level marked on your tank.
"How often should I change the cleaning solution?"
You'll know it's time to change your solution when it starts looking dirty or your items aren't getting as clean as before. For heavy use, this might mean changing it daily. For occasional use, you might go several cleaning sessions before needing a fresh solution.

Rather than spending more money, understanding how to use ultrasonic cleaner properly saves you more trouble. Even basic ultrasonic cleaners can give professional results when you follow the right steps. What matters most is matching your cleaning routine to what you're cleaning.
Here are the key points for successful ultrasonic cleaning:
Every ultrasonic cleaner, regardless of price, works using the same basic principles. Understanding these principles helps you get professional-level results without spending professional-level money.
And always feel free to contact us via Creworks support email if you have any questions about your ultrasonic cleaner operation issues. Our experts can recommend the best solutions for your specific cleaning needs.


Leave a comment