With over 10000+ orders
With over 10000+ orders
Last summer, my lawnmower started acting up. It sputtered, stalled, and wouldn't idle right. I checked the spark plug, air filter, and fuel. But the real problem was a dirty carburetor. I tried different cleaning methods and finally I found that an ultrasonic cleaner works best for cleaning the carburetor. It made my engine run like new again.
Are you having trouble with your small engine, motorcycle, ATV, or boat? I'll show you how ultrasonic cleaning fixed my carburetor problems. I'll share how to spot when your carburetor needs cleaning and guide you through each step of the process that worked for me.

Before I took my engine apart, I wanted to make sure I was fixing the right problem. Here's what told me my carburetor was dirty:
My engine was hard to start, especially on cool mornings
The idle speed went up and down on its own
The engine was slow to speed up when I gave it gas
Black smoke came out of the exhaust sometimes
It was using more gas than before
I learned that all these signs point to fuel problems. In engines with carburetors, this usually means the small parts inside the carburetor are dirty or stuck.
Like most people, I first tried the easy way out:
I started with spray carburetor cleaner from the auto parts store. I sprayed it wherever I could reach. The engine ran better for about two days. Then all the problems came back.
Next, I tried soaking parts in a cleaner and scrubbing them. This helped for maybe a week before the engine started acting up again.
I found out why these methods don't work well. Carburetors have tiny passages inside them. Some are only about as thick as a few pieces of paper (0.016 inches). Regular cleaning just can't reach all these small spaces. Scientists found that even tiny bits of dirt (0.002 inches) can cut fuel flow by 25%. No wonder my engine wasn't running right!

After getting nowhere with regular methods, a mechanic friend told me about ultrasonic cleaning. It works in an amazing way. Ultrasonic cleaners use sound waves you can't hear to make millions of tiny bubbles in the cleaning liquid. When these bubbles pop, they create little shock waves that blast dirt away from every surface - even inside the smallest passages.
This bubble-cleaning process (called cavitation) removes:
Sticky brown residue from old gas (called varnish)
Black carbon buildup from burning fuel
Rust and metal bits that block fuel flow
Old gasket material stuck to metal surfaces

My first try at taking apart a carburetor taught me a hard lesson. I rushed and mixed up parts that looked alike. Putting it back together was a nightmare.
Here's what I do now:
Take lots of pictures before removing anything
Set up a clean work area with good light
Use a magnetic tray to keep small parts from getting lost
Use the right screwdrivers (standard ones can damage carburetor screws)
Note: I put masking tape labels on small parts as I remove them. This really helps with the tiny jets and needle valves that look similar but aren't the same.
Before using the ultrasonic cleaner, I do some prep work that makes a big difference:
I take off all rubber, plastic, and gasket parts (the ultrasonic cleaner can damage these)
I soak the metal parts in a mix of Pine-Sol and water (half and half) for about 30 minutes to soften the gunk
I use compressed air to blow out loose dirt from the parts I can see
This prep work makes the ultrasonic cleaning work much better.

After trying different cleaners and solutions, here's what worked best:
An ultrasonic cleaner that lets me control the temperature (I got a 2-liter one online)
A cleaning mix of 80% distilled water and 20% Simple Green HD (this is safe for aluminum parts)
Temperature set to 140°F - warm enough to clean well but not hot enough to damage parts
My cleaning times were:
15 minutes for aluminum parts
Up to 25 minutes for brass and steel parts
I made sure parts weren't stacked so the sound waves could reach all surfaces
Cool fact: Ultrasonic cleaning and found it removed over 99% of dirt from metal surfaces. Regular soaking methods only removed 60-70%.
What you do after cleaning is just as important as the cleaning itself:
I rinse all parts well with distilled water to wash away any leftover cleaner
I use compressed air (not too strong, about 40-50 PSI) to blow out all passages
I hold parts up to light and look through the tiny holes to make sure they're clean
I put a light coat of WD-40 Silicone Lubricant on moving parts like throttle shafts
I let everything dry completely before putting it back together
Reassembly takes careful attention:
I always use new gaskets instead of reusing old ones
I tighten bolts to the right tightness (usually 8-10 inch-pounds for carburetor bolts)
I set the float height according to the manual
I adjust the idle mixture screws (usually starting at 1.5 turns out)
After putting it back on the engine, I do fine-tuning:
I start the engine and let it warm up
I adjust the idle speed to what the manual says
I turn the idle mixture screw 1/4 turn at a time until the engine runs smoothest
I check how the engine responds when I give it gas
The difference after ultrasonic cleaning was incredible. My engine:
Started right up on the first pull, even after sitting for weeks
Kept a steady idle without jumping up and down
Sped up smoothly when I gave it gas
Ran much quieter than before
Used less fuel
Best of all, these improvements have lasted for several seasons - much longer than with the other cleaning methods I tried.
During my carburetor cleaning adventures, I ran into a few issues worth sharing:
When my engine still backfired after cleaning, I learned that WHERE the backfire happens matters:
Popping sounds from the air cleaner: This usually means the engine isn't getting enough fuel (often from a partly clogged main jet)
Popping from the exhaust pipe: This usually means too much fuel (often from a stuck float or fuel level set too high)
If your carburetor gets dirty again soon after cleaning, look at these parts:
Your fuel tank might have rust or dirt that's getting into the carburetor
Your fuel filter might be bad or missing
The fuel valve (petcock) might have problems inside
I fixed this by cleaning my whole fuel system and putting in a new fuel filter.
Ultrasonic cleaning is powerful but can cause problems if not done right:
Aluminum parts can get dull or pitted if cleaned too long or too hot
Small springs and clips can get lost in the bottom of the cleaner
Some special coatings might come off certain parts
I avoided these problems by separating different metals and using shorter cleaning times for aluminum parts.
Ultrasonic cleaning works by making tiny bubbles that form and pop rapidly. These popping bubbles create cleaning power that reaches everywhere. The sound wave frequency (usually 40-45kHz for carburetors) controls the bubble size.
Higher frequencies make smaller bubbles for gentle cleaning. Lower frequencies make bigger bubbles that clean more aggressively. For carburetors, the middle range (40kHz) works best - strong enough to clean well but not so strong that it damages aluminum parts.

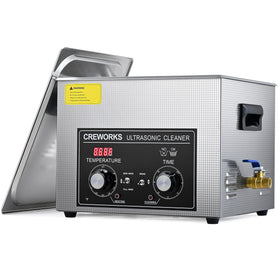
After trying several brands, I settled on a Creworks ultrasonic cleaner for my shop. Their 180W model with the 1.6-gallon tank fits even larger motorcycle carburetors, and the 40kHz frequency is perfect for carburetor cleaning. What sold me was the heating function (up to 176°F) and digital controls that let me dial in the exact time and temperature for different materials. I can clean my aluminum carb parts at lower temperatures, then crank it up for the brass and steel components without worrying about damage. The stainless steel basket keeps small parts from getting lost at the bottom, which happened with my first cheaper cleaner.
I'm not exaggerating when I say this method cleans at a microscopic level without taking apart components that are pressed together - something you simply can't do with manual cleaning methods. If you're serious about getting your engines running right, it's worth investing in the right equipment.
Ultrasonic cleaning is the fastest method that actually works long-term. While spray cleaners might seem quicker initially, they don't clean thoroughly and problems return within days.
A complete ultrasonic cleaning takes about 30 minutes of actual cleaning time (plus disassembly and reassembly), but the results last for seasons, not just days or weeks.
For ultrasonic cleaning, a mixture of 80% distilled water and 20% Simple Green HD works well and is safe for aluminum parts. For pre-soaking, equal parts Pine-Sol and water helps loosen debris. Commercial carburetor dip cleaners work but can be harsh on aluminum.
Avoid using brake cleaner, acetone, or other harsh solvents that can damage gasket surfaces and plastic parts.
You can't thoroughly clean a carburetor without disassembly.
Products that claim to clean carburetors while they're still on the engine only work temporarily at best. They might clear minor clogs but can't remove hardened deposits in tiny passages.
For a lasting fix, proper disassembly and ultrasonic cleaning is necessary. If you can't disassemble the carburetor yourself, consider professional service.
With proper fuel management (using fuel stabilizers and ethanol-free fuel when possible), a carburetor might only need cleaning every 2-3 years with regular use. Equipment that sits unused for long periods may need more frequent cleaning. If you notice any symptoms of poor running, cleaning may be needed regardless of time passed. Regular preventive maintenance greatly reduces how often deep cleaning is necessary.
While DIY ultrasonic cleaning worked great for my regular carburetor, sometimes it's better to get professional help:
For old or rare carburetors with hard-to-replace parts
For motorcycles with multiple carburetors that need to be balanced
For carburetors with electronic parts or special coatings
When parts are stuck and need special tools to remove
In these cases, professionals have better equipment and knowledge that's worth paying for.
The best way to deal with dirty carburetors is to prevent them from getting dirty in the first place. Here's what I do now:
I add fuel stabilizer when storing my equipment for more than a month
I run the engine until it's out of gas before long-term storage
I use ethanol-free fuel when I can find it (ethanol attracts water and creates more gunk)
I clean the air filter often to keep dirt out of the carburetor
These simple steps have really cut down on how often I need to clean my carburetors.
Ultrasonic cleaning changed how I take care of my small engines. What used to be a constant headache is now an easy fix that lasts a long time. If you're having carburetor troubles, I hope my experience helps you get your engine running right again.


Leave a comment