With over 10000+ orders
With over 10000+ orders
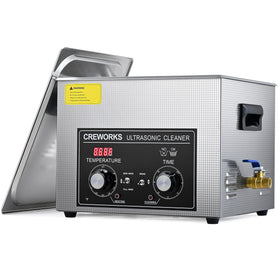
Using an ultrasonic cleaner involves several steps to ensure effective and safe cleaning. Ultrasonic cleaners use high-frequency sound waves to create microscopic bubbles in a cleaning solution. When these bubbles implode against your items, they effectively blast away contaminants from even the most intricate surfaces. Here's the step-by-step guide to using an ultrasonic cleaner effectively and safely:
Always start by reading the user manual provided by the manufacturer. Different ultrasonic cleaners may have specific instructions or features that you need to be aware of.
Place the ultrasonic cleaner on a flat and stable surface.
Ensure the unit is plugged into a grounded electrical outlet.
Fill the ultrasonic cleaner tank with a suitable cleaning solution. The type of solution depends on the items you're cleaning. Many ultrasonic cleaners work well with water-based solutions, but specific applications may require specialized cleaning agents.
Make sure that the water level is sufficient to cover the items you want to clean. Avoid overfilling the tank.
Disassemble items if possible. Remove any heavy dirt or debris manually.
Ensure that the items you're cleaning are compatible with the ultrasonic cleaning process. Some materials may be sensitive to ultrasonic cleaning, so refer to the manufacturer's guidelines.
Most ultrasonic cleaners have a built-in timer. Set the cleaning time according to the recommendations in the user manual. Avoid running the cleaner for longer than necessary to prevent unnecessary wear.
If your ultrasonic cleaner has a heating function, set the temperature according to the type of cleaning solution being used. Warm solutions generally enhance the cleaning process.
Submerge the items to be cleaned in the solution. Make sure they are not too crowded to allow the cleaning solution and ultrasonic waves to reach all surfaces.
Turn on the ultrasonic cleaner. You may need to press a button or set a switch to start the cleaning process.
Keep an eye on the items while they are being cleaned. If necessary, agitate or reposition them to ensure all surfaces are exposed to the ultrasonic waves.
Once the cleaning cycle is complete, turn off the ultrasonic cleaner.
Remove the items from the cleaning solution and rinse them thoroughly with clean water to remove any residue.
Dry the cleaned items completely before reassembling or using them.
Periodically clean the ultrasonic cleaner tank to remove any sediment or residue that may accumulate.
Always follow the specific instructions provided by the manufacturer for your particular ultrasonic cleaner model.

When used correctly, ultrasonic cleaners provide an efficient and thorough cleaning solution for many different items—from jewelry and watches to electronic components and dental instruments.
By following these steps and your manufacturer's specific guidelines, you'll achieve optimal cleaning results while extending the life of both your ultrasonic cleaner and the items you clean with it.
Q1: What types of items can be safely cleaned in an ultrasonic cleaner?
Ultrasonic cleaners are suitable for many items like jewelry, watches, electronic components, dental tools, and small metal parts. However, some materials like soft stones, or delicate electronics might be damaged, so always check compatibility. Check 3 Types of Items Never To Put In An Ultrasonic Cleaner
Q2: How often should I clean the ultrasonic cleaner tank?
The tank should be cleaned periodically to remove sediment and residue buildup. This maintains cleaning efficiency and prevents contamination of future cleaning cycles.
Q3: Can I use any cleaning solution in the ultrasonic cleaner?
Water-based solutions are commonly used, but for specific cleaning needs, special agents may be required. Always follow manufacturer recommendations for the solution type and concentration. Check What Liquid to Use in Ultrasonic Cleaner
Q4: Is it necessary to use the heating function?
Heating can generally enhance cleaning by improving solution effectiveness, but it’s optional. Use the temperature settings recommended for your cleaning solution and items.
Q5: How long should the cleaning cycle be?
Cleaning time depends on the item and contamination level but set it according to the manufacturer's instructions to avoid excessive wear on the cleaner.
Q6: Do items need to be pre-cleaned before ultrasonic cleaning?
Heavy dirt or debris should be manually removed before placing items in the ultrasonic cleaner to improve cleaning results and protect the machine.
Q7: Can items be crowded in the tank?
Avoid overcrowding. Items should be positioned so that ultrasonic waves and cleaning solution can reach all surfaces evenly.


Leave a comment