With over 10000+ orders
With over 10000+ orders
I have tested all the tricks in the book to clean out clogged carburetors, but using an ultrasonic cleaner to clean the carburetor is the best. It does not matter whether I remake old parts or simply keep them in excellent condition; an ultrasonic car part cleaner has made all the changes. So, let me go over how I apply it, why it is so effective, and the machine I would recommend in this guide.

Cleaning a carburetor with an ultrasonic cleaner is easier than can be expected, yet it is the little things that make the difference. So, here is my complete summary of steps:
Chemical or toxic acids are among the top liquids not to use in an ultrasonic cleaner. Instead, to clean a carburetor, apply a liquid degreaser that is a water-based solution, or directly water with a few drops of dishwashing soap.
Some individuals vouch for specialized ultrasonic solutions or Simple Green. Simply make sure that what you use is not corrosive or unsafe to unprotected metal and alloyed aluminum.
I run a simple wipe-down, getting rid of oil and rubbish, before throwing it into the tank. The deep stuff is put into the ultrasonic cleaner, but make sure that you remove the loose dirt first.
Break down the carburetor: gaskets, jets, bowls, and all. The cleaner is most effective when all of the surfaces are exposed.
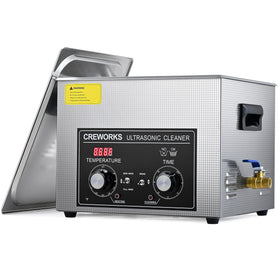
If you have a machine like the Creworks 22L or 30L ultrasonic cleaner, this is very easy with knobs or the digital panel.
Put your carburetor parts into the stainless-steel basket that is provided and immerse them in the bath. Press start and leave the bubbles to work their magic.
After a few minutes, you will see the dirt floating on top, and that is your indication that it is working.
After the cycle is completed, I wash it all with warm water, followed by blowing with compressed air. This aids in the prevention of corrosion and makes the carburetor bone dry prior to reassembly.

Carburetors have lots of little holes, associated corners, and sticky deposits. Washing by hand or dipping in chemicals is hardly effective at the core of the grime. However, when I dropped my first carburetor into an ultrasonic tank? It was perfect.
The secret is in cavitation. The ultrasonic cleaners emit 40kHz sound, directly translating to forming microscopic bubbles in the liquid. The bubbles burst and shoot off filth, even into the most inaccessible corners. It is soft, non-abrasive, and far more effective compared to brushing or soaking.
Besides carburetors, I’ve used my ultrasonic cleaner for car parts like:
Basically, anything metal that’s greasy, grimy, or gunked-up benefits from an ultrasonic bath.
Here's a side-by-side breakdown of the two methods I’ve used:
| Feature | Regular Cleaning | Ultrasonic Cleaner for Carburetor |
| Time Required | 1–2 hours | 15–30 minutes |
| Effectiveness on Hidden Grime | Low | High |
| Chemical Exposure | High | Low (water-based) |
| Labor Intensity | High | Low (set & forget) |
| Cleaning Small Passages | Difficult | Extremely Effective |
| Risk of Damage | Medium (scrubbing risk) | Low (non-abrasive) |
| Cost Over Time | Ongoing (solvents, tools) | One-time investment |
The bottom line is that I don’t waste my time with brushes anymore.
Not all ultrasonic cleaners are built the same. For automotive parts like carburetors, size and power really matter.
So, here’s what to look for:
| Feature | Why It Matters |
| Tank Size (22L–30L) | Carburetors are bulky; space is essential |
| Power (480W–600W) | More power = faster, deeper cleaning |
| Heater (600W or more) | Heat boosts cleaning performance |
| Durable Materials | Stainless steel tank & basket = longevity |
| Digital Timer | Precision cleaning without overdoing it |

This 22L Ultrasonic Cleaner is perfect if you're starting out. Compact yet powerful, easy knob controls, and a solid 22L capacity. It fits most standard carburetors without taking up too much space.
If you’ve got bigger car parts or plan on frequent cleaning, go for this 30L ultrasonic cleaner. The digital control panel is super intuitive, and the added power helps clean faster.
This 30L Dual Mode Ultrasonic Cleaner is the top-tier beast. Ideal for serious mechanics or shops. With degas and gentle modes, an extended timer (up to 99 min), and dual heating power, it’s built for heavy-duty use.

Ever since I started using an ultrasonic cleaner for carburetors, I’ve saved hours of effort, and my results are way better. From fuel systems to bolts and beyond, using an ultrasonic cleaner for car parts has become part of my regular maintenance routine.
So, are you still hesitating with conventional cleaning and spending money on chemicals? Now it is time to level up. Believe me, after watching the gunk liquefy right before your eyes, then wondering how you ever survived without the product, you will never flush without it.


Leave a comment